
How the assembly is built
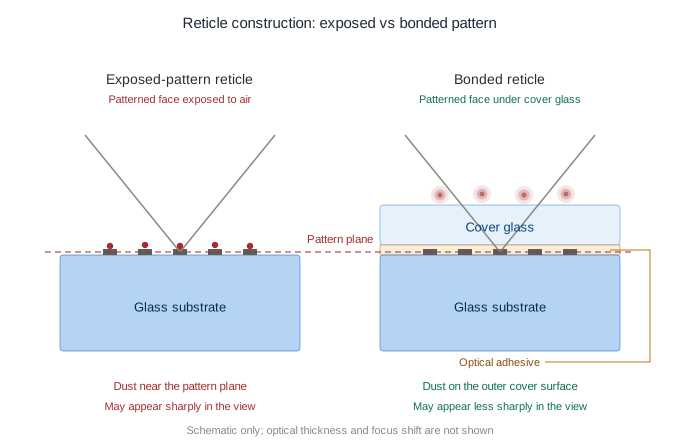
A bonded reticle places a cover glass over the patterned face of a glass substrate, with an optical adhesive between them. In the arrangement shown above, light from the objective passes through the cover glass and bond layer before reaching the chromium pattern. The patterned face remains the reticle reference plane; its location must match the instrument's intended image plane.
The drawing compares this arrangement with an exposed-pattern reticle. It shows the layer order and the different locations where surface contamination can settle, not a specified thickness or optical prescription.
Why protect the pattern
On an exposed reticle, dust or cleaning damage on the patterned face can be visible near the same focus as the reference lines. Bonding puts that face inside the assembly, where routine handling and cleaning cannot touch it. Dust can still settle on the outside of the cover glass, but its separation from the pattern may make it less sharply visible. The result depends on the optical system's depth of focus; the cover does not make contamination harmless.
The protected pattern is useful when an instrument will be assembled, cleaned or serviced repeatedly. It can also reduce direct exposure of the patterned face to the environment. Long-term resistance to moisture, adhesive ageing or other conditions must be verified for the actual material stack and service environment.
What changes in the optical design
The cover glass and adhesive add optical thickness in front of the pattern in the illustrated arrangement. Their thicknesses and refractive indices can change the focus position and introduce image effects in a converging beam. The instrument designer should confirm the patterned plane, eyepiece focus and parallax after the stack is included in the optical model.
Bonding replaces an exposed glass-to-air interface with internal glass-to-adhesive interfaces, but it does not remove every reflection. Stray light and contrast depend on the coating, adhesive, outer surfaces, illumination and viewing geometry. They should be assessed in the complete instrument.
What to inspect
- Pattern line width, continuity and position against the specified datums.
- Cover-glass alignment, parallelism or wedge, and the assembled pattern-plane position.
- Bond-line uniformity, bubbles, inclusions and cleanliness in the clear aperture.
- Optical appearance and any environmental checks defined for the intended use.
Acceptance limits and inspection methods belong in the project drawing or agreed specification. A clear cover alone does not establish whether the assembled reticle meets the instrument requirement.
Confirmed reference specifications
The following values are confirmed reference ranges for this bonded-reticle configuration. Final acceptance remains tied to the approved drawing and inspection record.
| Item | Reference value |
|---|---|
| Interlayer thickness | 110 ± 4 nm |
| Cover-glass thickness | 1.5–2 mm |
| Photolithographic line-width tolerance | ±0.2 µm |
| Surface quality | 1–10 |
| Round outside diameter | 6–90 mm |
Choosing the structure
An exposed pattern can suit an instrument whose reticle face is protected by its housing and rarely handled. A bonded cover is worth evaluating where the patterned surface needs additional protection or the external face must be cleaned in service. The choice also depends on available space, focus allowance, reflections and how the assembly will be inspected.
For a technical review, provide the pattern artwork, glass and cover requirements, layer order, viewing side, target image-plane location, mechanical datums, clear aperture and intended environment. State which assembled features are critical to acceptance, and include the current drawing revision.